Difference between revisions of "Help:QuickStart"
| Line 92: | Line 92: | ||
When finished with the annotation of valency you return to your tabular annotation editor, where the valence values now appear as a hyphenated string (as shown in the screen shot to the right) exposing the valency specifications that you have chosen for the phrase under annotation. | When finished with the annotation of valency you return to your tabular annotation editor, where the valence values now appear as a hyphenated string (as shown in the screen shot to the right) exposing the valency specifications that you have chosen for the phrase under annotation. | ||
| + | |||
| + | |||
| + | |||
| + | |||
| + | |||
===Export=== | ===Export=== | ||
| Line 106: | Line 111: | ||
For a description of the export to the TCwiki, please follow this link: [[TypeCraft Export|Export to the TC wiki]]. | For a description of the export to the TCwiki, please follow this link: [[TypeCraft Export|Export to the TC wiki]]. | ||
| − | ===Export to WORD and Open Office=== | + | ====Export to WORD and Open Office==== |
The export to WORD or Open Office is done through several simple steps: | The export to WORD or Open Office is done through several simple steps: | ||
Go to the TypeCraft Editor by opening *My texts*. You select one of your texts and open it. This can look for example like this: | Go to the TypeCraft Editor by opening *My texts*. You select one of your texts and open it. This can look for example like this: | ||
Revision as of 16:57, 28 September 2014
|
|
This page is currently under development.Thank you for your patience. |
Contents
This is the TypeCraft QuickStart Guide
For more information about linguistic online editing with TypeCraft, search in the TypeCraft database, exporting TypeCraft data, or editing the TypeCraft wiki, please consult one of the following TypeCraft wiki pages:
- Help with the TypeCraft Editor for Newcomers
- Help with the using the TypeCraft Editor
- Help with posting on the TypeCraft Wiki
- Help with Search in Typecraft data
- Help with Editing the TypeCraft wiki
Help with the TC Editors
Annotation using the TypeCraft 2.0 editor
You enter the TC2 editor by clicking on New text one the TypeCraft navigation bar. The editor opens a dialog window with the following message:
Your text will use the new and better TC editor.
If for some reason you want to use the old editor choose
No below.
The word "Text" in the phrase "Your text" above refers to any piece of digital writing not yet linguisticaly annotated. To annotate this text in the new editor, you now press "yes".
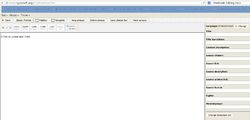
The editor's text area opens (see screenshot to the left). To the right the Metadata matrix is accessible. We offer a default Metadata template and a template for the Norwegian Centre for Writing and Writing Research. (You find a *Change Metadata set* bottom at the end of the template.)
You enter your text into the text area by copying & pasting text from a file or from an online site into the text area. Next you select the text's lanuage in the metadata template and provide the rest of the metadata. You always can come back to this, and fill in missing information.
Back to the text area you now define what we call Phrases for annotation. TypeCraft phrases might be sentences or fragments. Also, text does not need to be annotated sentence by sentence, although that is also possible by .............. ............... .
You select an element for annotation by highlighting it. You then press the New Phrase button which will put the selected element into the Phrase list. In the text area this phrase now appears in green.
Now it is time for starting with the core annotation. You can do that in two ways. You double-click on one of the instantiated elements in the text area (those sentence in green colour), or you open the Phrase list by clicking on *View Phrase list*.
When the phrase opens a dialogue window pops-up with the following message:
 TypeCraft wants to know
which of the following options you prefer:
1. to insert full forms into the table directly (recommended).
      Choosing this option allows you to separate affixes from word stems
      in the input mask below. Insert hyphens "-" or spaces " " to indicate morph
      or word boundaries and then click OK.
2. to manually insert words from your phrase into the table.
      For this option, click *Cancel* and an empty table will appear.
The tabular annotation editor
After you have decided whether you would like to work with a pre-filled table which realises your choices of morph boundaries, or you would like to start with a clean table, the tabular editor will open, respectively, pre-filled or empty.
You annotate by navigating through the table. We recommend that you add annotations to the tiers vertically by making use of the space bar. This method is in our experience the fastest.
 To learn more about the tiers and annotation tags and levels go to
         Multi-level linguistic annotation with TypeCraft
The *WORD* and the *MORPH* tiers feature a menu bar which allows you to modify existing entries. The menu bar appears when you activate the field you want to change. From the menu you can also add words or change the word's segmentation. *Gloss* and *POS* tags are chosen from a predefined list. You find an overview over all Gloss and POS tags on your navigation bar. These lists are auto-generated and can be ordered by category at your convenience. The lists also provide short definitions for each tag.
The annotation table is supplemented by a large note field. Notice that also the content of the note field can be searched, and if you for example use a designated marker to flag sentences that you would like to target by a search, this can be done easily. Is the annotation of a phrase questionable, you could add a question mark to the Note field. A search for "?" in the note field will then allow you to target by a search only sentences with questionable annotations.
Annotation for Valence using the Construction description template
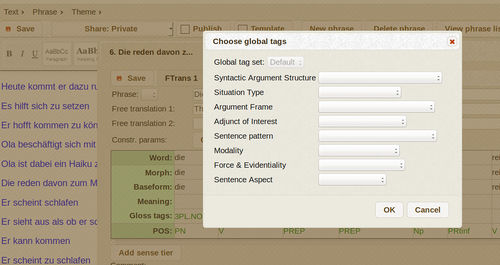
You enter the valence annotation mode from the tabular editor by pressing the * Change* to the right of the label Valence which you find above the word- and morph-level annotation table.
An additional annotation windows,as shown in the screenshot to the left, appears and allows you to specify valency attributes using a predefined vocabulary.
While the valence annotation schema is still under development, we allow at this point we the input of the following attributes:
   * Syntactic Argument Structure   * Salient Sentence Pattern
   * Situation Type                 * Force & Eventuality
   * Diathesis                      * Modality
   * Adjunct of Interest            * Sentence Aspect
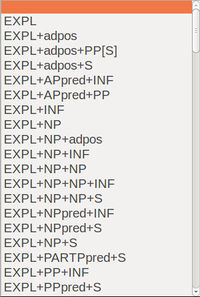
Each of these attributes has a set of possible values. Some of thehe values for the attribute Syntactic Argument Structure are shown to the the right in the wayleft: they appear in the drop-down window.
More about Valence annotation in TypeCraft can be found under:
   To learn more about Valence annotation in TypeCraft go to
         Multi-level linguistic annotation with TypeCraft
When finished with the annotation of valency you return to your tabular annotation editor, where the valence values now appear as a hyphenated string (as shown in the screen shot to the right) exposing the valency specifications that you have chosen for the phrase under annotation.
Export
The TypeCraft user-interface allows for several forms of export:
- Export to the TCwiki
- Export to HTML
- Export to WORD and Open Office
In your TypeCraft Editor go to the tab *Phrase* in the upper left corner of your editor window. When pressing on *Phrase* a drop-down window opens. Select the first option which is: *Export*.
Export to the TCwiki
For a description of the export to the TCwiki, please follow this link: Export to the TC wiki.
Export to WORD and Open Office
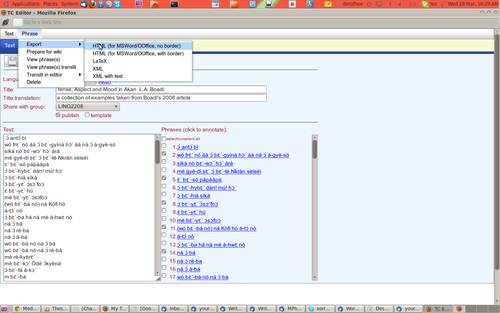
The export to WORD or Open Office is done through several simple steps: Go to the TypeCraft Editor by opening *My texts*. You select one of your texts and open it. This can look for example like this:
As shown in the picture on the left, you can now select the sentences that you would like to export by marking them in the check boxes on the left of the instantiated sentences (the blue sentences to the right of the Editor window). Go to the tool tabs of the Editor window and select Phrases -> Export -> HTML (just as it is shown in the picture). You have the choice of exporting the examples with or without border. Make your choice and save the Tc-export file to your computer. (You will see a small pop-up window that asks you to either open or save the Tc-export file. You should save the file.) When you now open the exported file on your machine, the default option that you will be presented with is to open the file in your browser (for example Firefox,Chrome, IE or Safari). In order to save the Tc-export file as a WORD or Open Office document you have to open the file by choosing the option *Open with* -> WORD or Open Office. Notice that the imported examples can still be manipulated. For example you might want to change the font size or highlight certain glosses, add colour or borders.
This is a feature of your TypeCraft editor that must be set by the system administrator. In your mail to the administrator, please state which name you wish for your group (for example the name of your project or the name of the language you work on), and the TypeCraft user names of all members of the group that you would like to start. The system administrator will create the group for you. This will not take very long, and when the group is created, you can start to assign texts to your group, by selecting in your TypeCraft Editor from the *Share with group* line your group.
Annotation using the TypeCraft 1.0 editor
Click *My Text* in the navigation-bar. The TC Editor opens. You may now enter or copy-and-paste a text into the left part of the editor window. Do not add morph boundaries at this point. At this point the TC Editor only accepts text strings. Before you start to tokenize your text strings, determine the language of your text by going to the *CHANGE* button. TC uses the ISO-639-1 code for languages. Please use the drop-down window to select one of the ISO language namYour text will use the new and better TC editor. If for some reason you want to use the old editor choose No below.s. Give your text a title and a title translation if appropriate. Text title and title translation will inform *Text search* and therefore should be chosen with care.
Tokenization You can tokenise your text into sentences. This generally works quite well. TypeCraft has at this point still problems with period signs for example in titles like Mr. or Dr. and semicolons. In order to tokenise you text or collection of sentences press *CREATE PHRASES*; this will initiate the tokenization. Inspect the result before you choose *Yes* from the dialogue box. If you have not highlighted parts of your text, TC will ask you whether you would like to tokenize the whole text. Say *Yes*. The tokenization can be repeated several times until you are content with the result.
Morph break-up Select a sentence from the set of tokenised sentences which now have appeared on the right hand side of your editor window. Click on one sentence. This will open a dialogue box. Follow the instructions in the dialogue box to insert morph boundaries into the annotation table.
Annotation Table Navigate through the annotation levels vertically by making use of the space bar. The *WORD* and the *MORPH* tier feature a menu bar which allows you to delete words/morphs which appear when you click on the field in those rows that you would like to change. From the menu you can also add words or change the word segmentation. *Gloss* and *POS* tags are chosen from a predefined list. You find an overview over all Gloss and POS tags on your navigation bar. These lists are auto-generated and can be ordered by category at your convenience. </span>


